A hidden leak can act like a slow drip in your budget and a quiet wrecking ball in your house. It can push up your water bill, feed mold, stain ceilings, warp wood, and turn a small repair into a costly mess.
The hard part is that many leaks stay out of sight, tucked behind walls, under floors, or near appliances. The good news is that hidden water leaks often leave clues before they become a crisis.
Start with the easy signs, then move to a few simple tests, and only bring in a plumber when the problem is hard to reach or unsafe.
Start with the warning signs most homeowners miss
Most hidden leaks don’t begin with a puddle on the floor. They start with small hints that are easy to brush off. One clue alone may not prove anything, but several clues together usually mean water is getting where it shouldn’t.
What your water bill, walls, and floors may be trying to tell you
First, look at your recent water bills. Compare the last one or two bills with your normal use for the same season. If your habits haven’t changed but the bill jumped, that matters.
A leak behind a wall or under a floor often shows up on paper before it shows up in plain sight. That’s why an unexplained rise in water use is one of the best early warnings.
Then scan your home slowly. Check ceilings for yellow or brown stains. Look for bubbling paint, peeling wallpaper, soft drywall, or baseboards that feel damp. On floors, watch for warped wood, loose vinyl, cracked tile, or carpet that feels damp for no clear reason.
These signs often show that water is moving behind the surface, not sitting on top of it. For more examples of common hidden leak signs, it’s helpful to compare what you’re seeing with typical problem patterns.

How to use sound and smell to catch a hidden leak early
Your nose and ears can help more than you think. A musty smell often means moisture is trapped in a wall, cabinet, crawl space, or under flooring. Even if you can’t see the wet spot, the odor can give it away.
Listen when the house is quiet, especially at night or early morning. If every faucet is off, you shouldn’t hear trickling, hissing, or faint running water. A soft hiss inside a wall may point to a pressurized pipe leak. A steady refill sound near a bathroom often means a toilet is leaking into the bowl.
Hot-water leaks can also create warm spots on certain floors. If one area feels oddly warm underfoot, and you don’t have floor heat there, pay attention. Water has a way of whispering before it shouts.
If you spot a stain, smell mustiness, and hear water when nothing is running, treat that pattern as a leak until proven otherwise.
Use simple DIY tests to confirm if your home has a leak
Once you notice signs, don’t start cutting drywall. Begin with easy checks that cost little and tell you a lot.

Do a water meter test to see if water is flowing when nothing is on
This is the clearest DIY test for a hidden leak. Turn off all water inside and outside the house. That includes faucets, showers, sprinklers, ice makers, and washing machines. Then find your water meter and note the reading.
Many meters have a small leak indicator dial or triangle that moves even with tiny water flow. Check that first. If it’s spinning while everything is off, water is moving somewhere.
Next, wait one to two hours without using any water. Return to the meter and compare the reading. If it changed, you likely have a leak in the home or the yard line. A step-by-step water leak test can help if your meter is hard to read.
If the meter moves while every fixture is off, that is your strongest DIY clue.
Try a toilet dye test, because toilets are one of the most common hidden leaks
Toilets waste a surprising amount of water when the flapper wears out. The leak often stays silent, so many homeowners miss it for months.
Remove the toilet tank lid and add a few drops of food coloring, or use a dye tablet. Wait 10 to 15 minutes and don’t flush. Then look in the bowl. If color shows up there, water is sneaking past the flapper.
This fix is often simple and cheap. Yet the waste can be huge over time. Because toilets leak internally, they usually don’t leave puddles. That’s why this test matters.
Check the places where hidden leaks happen most often
Now inspect the usual trouble spots. Start under sinks and around toilet bases. Then move behind the washing machine, near the water heater, around the dishwasher, and behind the refrigerator if it has an ice maker or water line.
Also check the HVAC drip pan, basement corners, crawl spaces, attics, and exterior hose bibs. Look for rust, white mineral crust, damp wood, swollen trim, soft drywall, or dark spots on concrete. A hose connection with a slow drip can stain a wall without leaving an obvious puddle.
Leaks behind walls are harder to confirm, but they still leave clues. If you suspect that kind of problem, this guide to finding a hidden wall leak shows what to check before opening anything up.
Use a few low-cost tools to find leaks behind walls and under floors
If your meter suggests a leak but you can’t find the spot, a couple of basic tools can narrow the search. You don’t need a contractor’s truck full of gear.
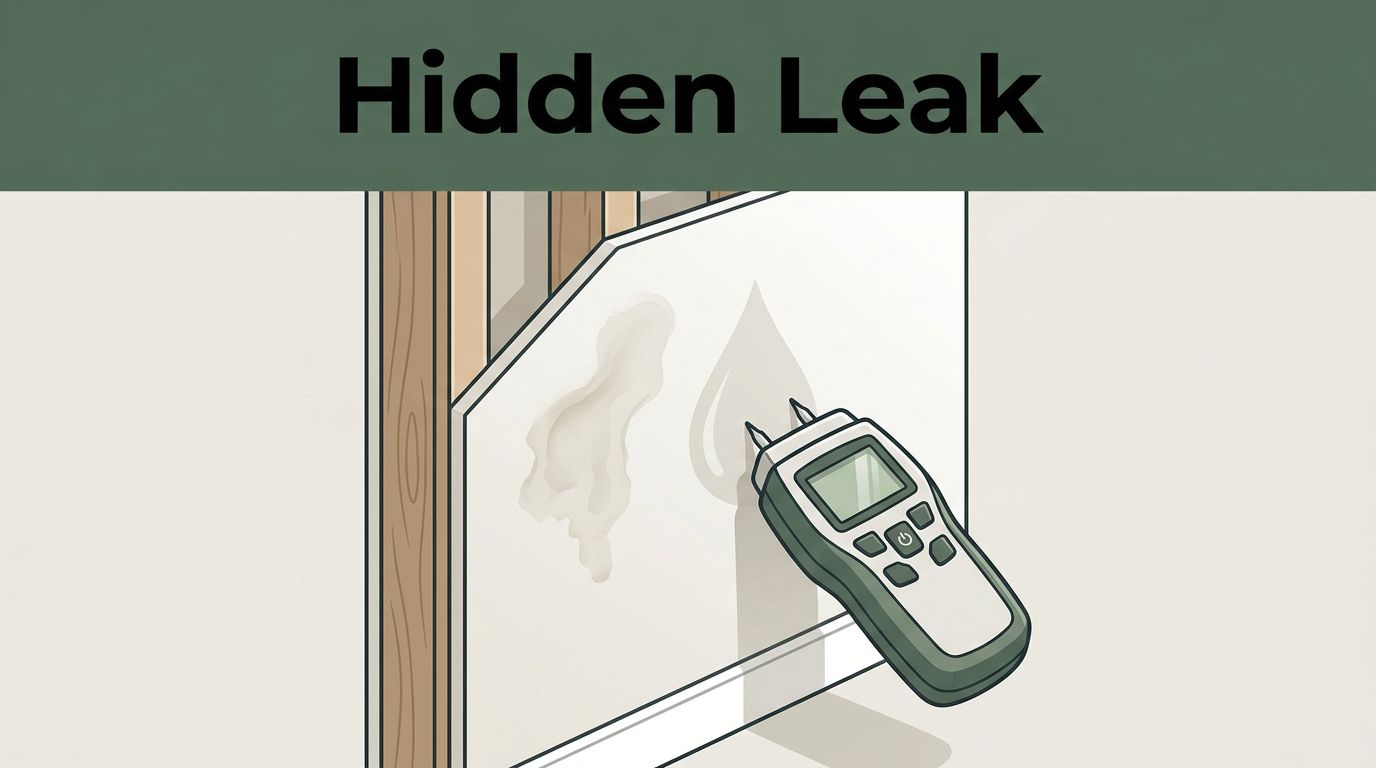
How a moisture meter can help you map damp areas without cutting drywall
A pinless moisture meter reads moisture below the surface of materials like drywall, wood, and laminate. It won’t tell you the exact pipe location, but it can help you map where the area is wetter than it should be.
Start by scanning a dry spot in the same room to get a baseline. Then compare that reading with the stained wall, the baseboard, or the soft floor section. If the suspect area reads much higher, you’ve confirmed moisture instead of guessing from looks alone.
This is useful because water travels. The stain you see isn’t always right over the leak. A moisture meter helps you follow the wet path instead of chasing the first mark you noticed.
When a basic listening tool or thermal camera can make leak detection easier
A low-cost plumbing listening tool, similar to a stethoscope, can help you hear water moving inside a wall or under a sink. It’s simple, but it works best in a quiet house.
Thermal cameras are even more helpful for hard-to-find leaks. They can reveal cool or warm wet areas behind surfaces, especially with hot-water lines or damp insulation. Many homeowners don’t need to buy one. Renting may make more sense, and in some cases hiring a pro is cheaper than guessing.
If you want a plain-language look at modern leak detection methods, it’s useful to see how acoustic tools and thermal scans work together.
Know when it’s time to call a plumber instead of guessing
DIY checks are great for finding patterns. They are not the right move for every leak. Some problems can damage the house fast, and some can put you at risk.
Signs the leak is serious, urgent, or unsafe
Stop troubleshooting and call a plumber if you notice any of these:
- Bulging ceilings or stains that are spreading fast
- Standing water on floors, in cabinets, or near the water heater
- Mold growth or a strong sewage smell
- Cracked or lifting flooring, especially near warm spots
- Wet areas near outlets, extension cords, or the breaker panel
- Repeated meter movement with no visible source
- Low water pressure across several fixtures
If water is active and spreading, shut off the main water valve first. That one move can save drywall, flooring, and cabinets.
What professional leak detection costs, and why early action usually saves money
Current U.S. pricing in March 2026 often looks like this:
| Service type | Typical cost |
|---|---|
| Basic leak detection | $175 to $350 |
| Simple detection plus repair | $300 to $500 |
| Hidden wall, slab, or hard-to-reach leak | $400 to $1,000+ for detection, often much more with repairs |
Simple pipe fixes often land around $150 to $500. However, once drywall cutting, flooring damage, or mold cleanup enters the picture, the total can climb fast. Large hidden leaks can push overall repair costs into the thousands.
That’s why early action usually saves money. A small service call is painful. Replacing soaked drywall, trim, flooring, and moldy insulation is worse. This home leak damage overview gives a good picture of how quickly a small leak can spread into bigger repair work.
A hidden leak rarely stays small for long. The best order is simple: watch for clues, run the meter test, check toilets and high-risk areas, then use a basic tool if the source still isn’t clear.
Make a quick leak check part of your monthly home routine. Small leaks grow quietly, and catching one early is often the cheapest repair you’ll ever make.